Serial Eeprom Programmer 93c56
Learn all about our serial EEPROM products in only 20 minutes with a webseminar: MPLAB® Starter Kit for Serial Memory Products: Serial EEPROM Overview. The programmer software can be used to read the device, save it to a file and program new EEPROMs. USB in system serial EEPROM programmer kit. You will need to connect the programmer leads to the correct pin on the IC clip and some more knowledge is needed to do this. First find the device datasheet to get the pin diagram of the device.
Here’s how to reprogram your odometer after an instrument cluster swap. The vehicle this was demonstrated on is a 2004 Honda Accord. YouTube Video: DIY Honda Odometer Reprogramming Disclaimer: 1. The information provided should only be used to correct mileage information. While it is not illegal to change your odometer reading, it is illegal to falsify or misrepresent the actual mileage of the vehicle.
The odometer display can be just as easily changed by swapping clusters to one of a lower mileage. This procedure requires disassembly of the cluster, and de-soldering of SMD components.
Use care and caution when dealing with delicate components, and practice first on a spare cluster. Let’s say you swapped an instrument cluster from a coupe to a sedan to change the look or color of the needles, or you’re replacing a defective cluster.
The mileage on most (Japanese) cars is stored on the instrument cluster itself, and not in the ECU. Therefore the mileage of the original vehicle that the cluster was from will be displayed on the dash. Odometer information is stored on a small EEPROM chip on the circuit board.
The chip can be read and written to using a serial programmer. The information is coded in HEX characters. The odometer information can be copied over from the old cluster to the new cluster using Honda HDS, assuming the original cluster is operable. What follows is a hack-around to using HDS, by programming the mileage directly to the chip. You can also opt to merely swap the chips, or copy and paste the program, rather than decode.' ' Tools and Parts Required: • Screwdrivers • Soldering iron, solder and a de-soldering pump • Computer with Windows XP and serial port • 8 pin DIP socket • Serial programmer - Breadboard - Hookup wire - Female serial port header - 5V from computer power supply - 4.7K ohm resistors - 5V Zener diodes o Wire strippers • Serial programming software (PonyProg freeware) • A spare instrument cluster in case you screw up Here's the original instrument cluster from my LX sedan, 314,622 km, and here’s my new cluster. It’s from an EX-L sedan with 211,150km.
Vaenga zhelayu peredelka prikoljnaya. He was on Operational Readiness Platform when IAF sensed incoming 20 F - 16 fighter planes.

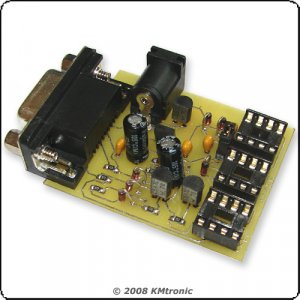
Once the cluster is out of the vehicle, pull up on a few tabs to remove the front plastic cover and fascia. The needles will need to come off next. Pull up on them carefully and they’ll come out. Take a photo of their home position before taking this apart so you know where to realign it upon reassembly. Use gloves and don’t touch the black face of the gauges, it’s a fingerprint magnet. Once the gauge face is removed, remove the white backing plate revealing the circuit board, with the L56 EEPROM chip. This is the EEPROM programmer I built to connect the chip to my desktop computer.
It interfaces through the RS232 serial port. All it is are three 5V zener diodes ($1) and three 4.7K ohm resistors ($1). The rest is some 22 AWG hookup wire and a breadboard ($5). And here’s my programmer connected to the PC.